How to select hardware for your cellular Internet connection
- Intro
- Pick a radio
- Decide between a smartphone and dedicated device
- Look for antenna connectors
- Take speed ratings with a grain of salt
- Look for Carrier Aggregation support
- Look at what bands are supported
- Band locking is handy
- Keep the cost in perspective
- Review your provider’s restrictions and recommendations
- Example radios
- Pick an antenna configuration
- Consider an amplifier
- Consider lightning protection
- Add cabling
- Next up: Install your hardware
Intro
You’ve selected a cellular network and data plan. Now it’s time to pick out the hardware that you’ll use for your Internet connection. This page breaks up the decision into a few steps:
- Pick a radio
- Pick an antenna configuration
- Consider an amplifier
- Consider lightning protection
- Add cabling
The idea is that you can stop going down this list as soon as you accomplish your Internet access goal. For example, you might find that you get fast Internet access with just a radio (step 1), or just a radio, plus indoor antenna (steps 1 and 2). If you’re in a more challenging location, or just want to get every bit of speed that’s possible, then later topics, like amplifiers and lightning protection can become relevant.
Breaking this up into five steps helps to simplify the process, but there are still a vast number of options to choose from at each step. I’ll try to provide some useful constraints by guiding you towards options that emphasize simplicity and flexibility.
Here are three example configurations created using the methodology on this page:
- An outdoor installation that uses two external antennas
- An indoor installation that provides a middle-ground between the expensive, but fast outdoor installation, and inexpensive, but slower tethering configuration
- Tethering to a cell phone
Pick a radio
The first piece of equipment to select is the smartphone, router, or another device to connect to your provider’s mobile network. For the sake of brevity, I refer to these devices as “radio” throughout the rest of this document.
The first piece of equipment to select is the smartphone, router, or another device to connect to your provider’s mobile network.
Decide between a smartphone and dedicated device
My recommended first step is to decide whether you’ll tether to a smartphone, or use a dedicated device, such as a hotspot, modem, or router for your Internet connection. The pick a data plan page discusses the pros and cons of those two options.
Look for antenna connectors
If you decided to go with a dedicated device as your radio, then I recommend making it a priority to select a device that comes with accessible antenna connectors. That way, if the built-in antennas aren’t sufficient, you have the option of adding one or more external antennas to boost signal strength and performance.
The connectors that I see most often on dedicated devices are:
- TS9 - this is on devices like the Netgear Nighthawk M1 and Inseego Mifi 8000.
- SMA - this is on devices like the MOFI4500 and WE826GO.
Both TS9 and SMA connectors are easy to find cabling for and get the job done, but TS9 is more fragile easily disconnected than the SMA. All things being equal, I’d opt for an SMA connector over TS9.
Most devices that have external antenna connectors contain two connectors. Having multiple connectors is a good thing because multiple antennas can boost your performance.
Take speed ratings with a grain of salt
When you look at the descriptions of radios, you’ll likely see claims like “300Mbps downloads”. These claims assume ideal conditions. Real-world performance will almost always be less than the advertised performance.
These speed ratings are still useful though, because:
- They provide a ceiling for performance expectations. If the advertised speeds are slower than what you want for Internet access, then it’s time to look for other options.
- They’re a proxy for specs (like carrier aggregation) that do impact real-world performance.
Look for Carrier Aggregation support
Carrier Aggregation (CA) allows multiple connections to exist between your device and the cell tower. It’s a feature that’s worth having because it has the potential double, or in some cases, more than double your Internet connection speed:
Look at what bands are supported
Compare the bands that are supported by a potential radio with the cellular network that you want to use.
Ideally, your device would support all of the LTE bands that the network uses in your area. PhoneArena maintains a list of LTE bands that are used by each of the major US carriers.
If you find yourself choosing between devices that support different subsets of your provider’s bands, then something to keep in mind is that, in general, lower frequency bands provide better range but weaker performance than higher frequency bands. Here some 4G LTE and 5G bands that are especially interesting for rural Intenet access in scenarios where you are having trouble getting a fast enough signal:
| Provider | Band | Approximate Frequency |
|---|---|---|
| T-Mobile | 71 | 600MHz |
| AT&T | 12 (aka, band 12/17) | 700MHz |
| Verizon | 13 | 750MHz |
| Sprint | 26 | 850MHz |
Band locking is handy
When I switched my home Internet connection from DSL to 4G LTE, I found that performance varied a great deal throughout the day, as my radio switched between the three AT&T bands that it saw a signal on. Worse yet, one of those bands only worked some of the time, so switching to it was painful.
I was able to eliminate that problem by configuring my radio only to use Band 2 using a feature that MOFI calls “BandLock”:
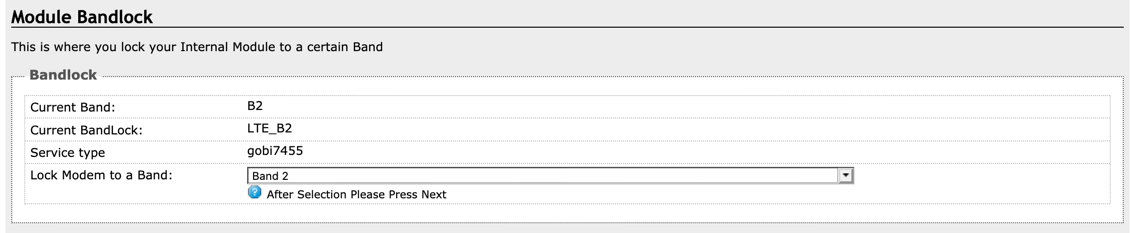
Not all radios support this, and it’s not needed in all scenarios, but it’s a nice feature to have available.
Band locking is also useful when aiming antennas because it lets you eliminate the variable of jumping between bands from the equation.
Keep the cost in perspective
The radio is likely to be the single most expensive piece of equipment that you purchase. If you have a good enough signal at your home, then it could also be the only piece of equipment that you need for Internet access. Purchasing a high-quality radio could make the difference between high-speed Internet access and or no Internet access or between needing an external antenna and not needing one.
Review your provider’s restrictions and recommendations
Some providers limit your hardware choices. For example, the Calyx Institute only allows two types of devices:
- A Coolpad Surf, which does not have external antenna connectors
- An Inseego Mifi 8000, which does have external antenna connectors
In this case, unless you feel confident that you’ll get a fast enough signal without an external antenna, I’d select the Mifi 8000 to keep your antenna options open.
Other provides, like UbiFi, offer pre-configured routers, like the MOFI4500 that come with external antenna connectors. If one of your carrier’s recommendations looks viable, then I’d seriously consider going with it. Purchasing directly from your carrier offers advantages, like knowing that the device is compatible with their network, and increasing the odds that your carrier can help you if you run into trouble.
Example radios
To make the above considerations more concrete, let’s examine a couple of example routers that you could use for cellular Internet access. The specs shown assume an unlocked version of each router:
Netgear Nighthawk M1
The Netgear Nighthawk M1 has the following specs:
- Out of the box antenna configuration: 4x internal antennas
- Antenna connectors: 2x TS9
- Max download speed: 1Gbps
- Max upload speed: 150Mbps
- Wired network: 1x Gigabit Ethernet (1Gbps) port
- WiFi network: 802.11ac (1Gbps max)
- Carriers supported: Verizon, ATT, T-Mobile, and Sprint
- LTE bands supported: 1, 2, 3, 4, 5, 7, 12, 29, 30, 66
- Band locking: Not officially supported, but there’s a workaround here
- LTE user equipment category: 16
- Carrier aggregation (CA): Supported
- MSRP: $349
MOFI4500
The MOFI4500 has the following specs:
- Out of the box antenna configuration: 2x external 5dBi omnidirectional antennas
- Antenna connectors: 2x SMA antenna
- Max download speed: 300Mbps (in aggregate - each Ethernet port can only deliver 100Mbps)
- Max upload speed: 50Mbps
- Wired network: 5x Fast Ethernet (100Mbps) ports (4 LAN and 1 WAN)
- WiFi network: 802.11n (300Mbps max)
- Carriers supported: Verizon, ATT, T-Mobile, and Sprint
- LTE bands supported: 1, 2, 3, 4, 5, 7, 8, 12, 13, 17, 20, 25, 26, 29, 30, 41
- Band locking: Supported out of the box
- LTE user equipment category: 6
- Carrier aggregation (CA): Supported
- MSRP: $315
Pick an antenna configuration
After you’ve selected a radio, it’s time to decide which antenna(s) to pair it with.
Learn what decibel, dB and dBi mean
Signal strength, antenna gain, and cable loss are all measured in dB (decibels). Decibels use a logarithmic scale, so
- Every 3dB increase represents a doubling of power
- Every 10dB increase represents power going up to 10x its previous level
Antenna specs often use “dBi” units, instead of just “dB.” For the purposes of this site, you can consider the two terms to be equivalent. If you’re interested in learning more, then Antenna Theory’s Decibels page is a good starting point.
Think about elevation
LTE works best when both ends of the connection (your antenna and the cell tower) have a line of sight to each other. Any obstacles, such as building, trees, or hills that are between them, degrade the quality of their connection.
In many situations, the best way to get, or come closer to line of sight is to add elevation to your antennas.
For an indoor antenna, gaining elevation is as simple as placing your antenna on the top floor or attic of your home.
For an outdoor antenna, see the antenna elevation guide.
Use multiband antennas
Both single band and multiband antennas are available. I recommend selecting a multiband antenna in most situations for a few reasons:
- Carrier aggregation can boost performance by transmitting and receiving on multiple bands at the same time
- Even if you aren’t going to use carrier aggregation, it hard to predict which band performs best at your location
- Technologies evolve, so having a multiband antenna reduces the odds that you’ll need to replace it in the future
Look for an antenna that supports whatever bands both your wireless provider and radio support.
Antennas specs often list ranges of frequencies, rather than band numbers. Wikipedia’s LTE frequency bands table is useful for translating between bands and frequencies.
Try an indoor configuration first
I recommend taking a minimalist approach to the initial antenna configuration, because it’s hard to say what is ideal, without testing. This means starting with either just the built-in antennas or an inexpensive indoor configuration. Here are some examples:
- If the radio that you selected has TS9 connectors, then the Netgear 6000450 MIMO antenna is a good starting point. It costs around $40 and can plug directly into your radio, so no extra cables need to be purchased.
- If the radio that you selected has SMA connectors, then there are many inexpensive omnidirectional upgrades available. Something with around 5dBi of gain would be a reasonable starting point. For example, the MOFI4500 model that this page links to costs $15 more than the base model because it comes with upgraded antennas.
If you’re able to get a fast enough Internet connection with just an indoor antenna configuration, then that’s great, because it’ll save you time and money. If you’re not satisfied with the performance that an indoor installation provides, then read on.
Set up a basic outdoor antenna configuration
A lot of the work and expense that goes into an outdoor antenna installation relates to mounting, waterproofing, cabling, and lightning protection. Fortunately, when weather permits, you can temporarily bypass most of those expenses, and use something much more straightforward to verify that an outdoor antenna configuration is justified.
For example, when I first switched my home Internet connection from DSL to 4G LTE, I set up a prototype that consisted of little more than a router, a single antenna, and a cable to connect the two. Only after that prototype proved itself, did I add a second antenna, lighting protection, and run cabling to inside my house.
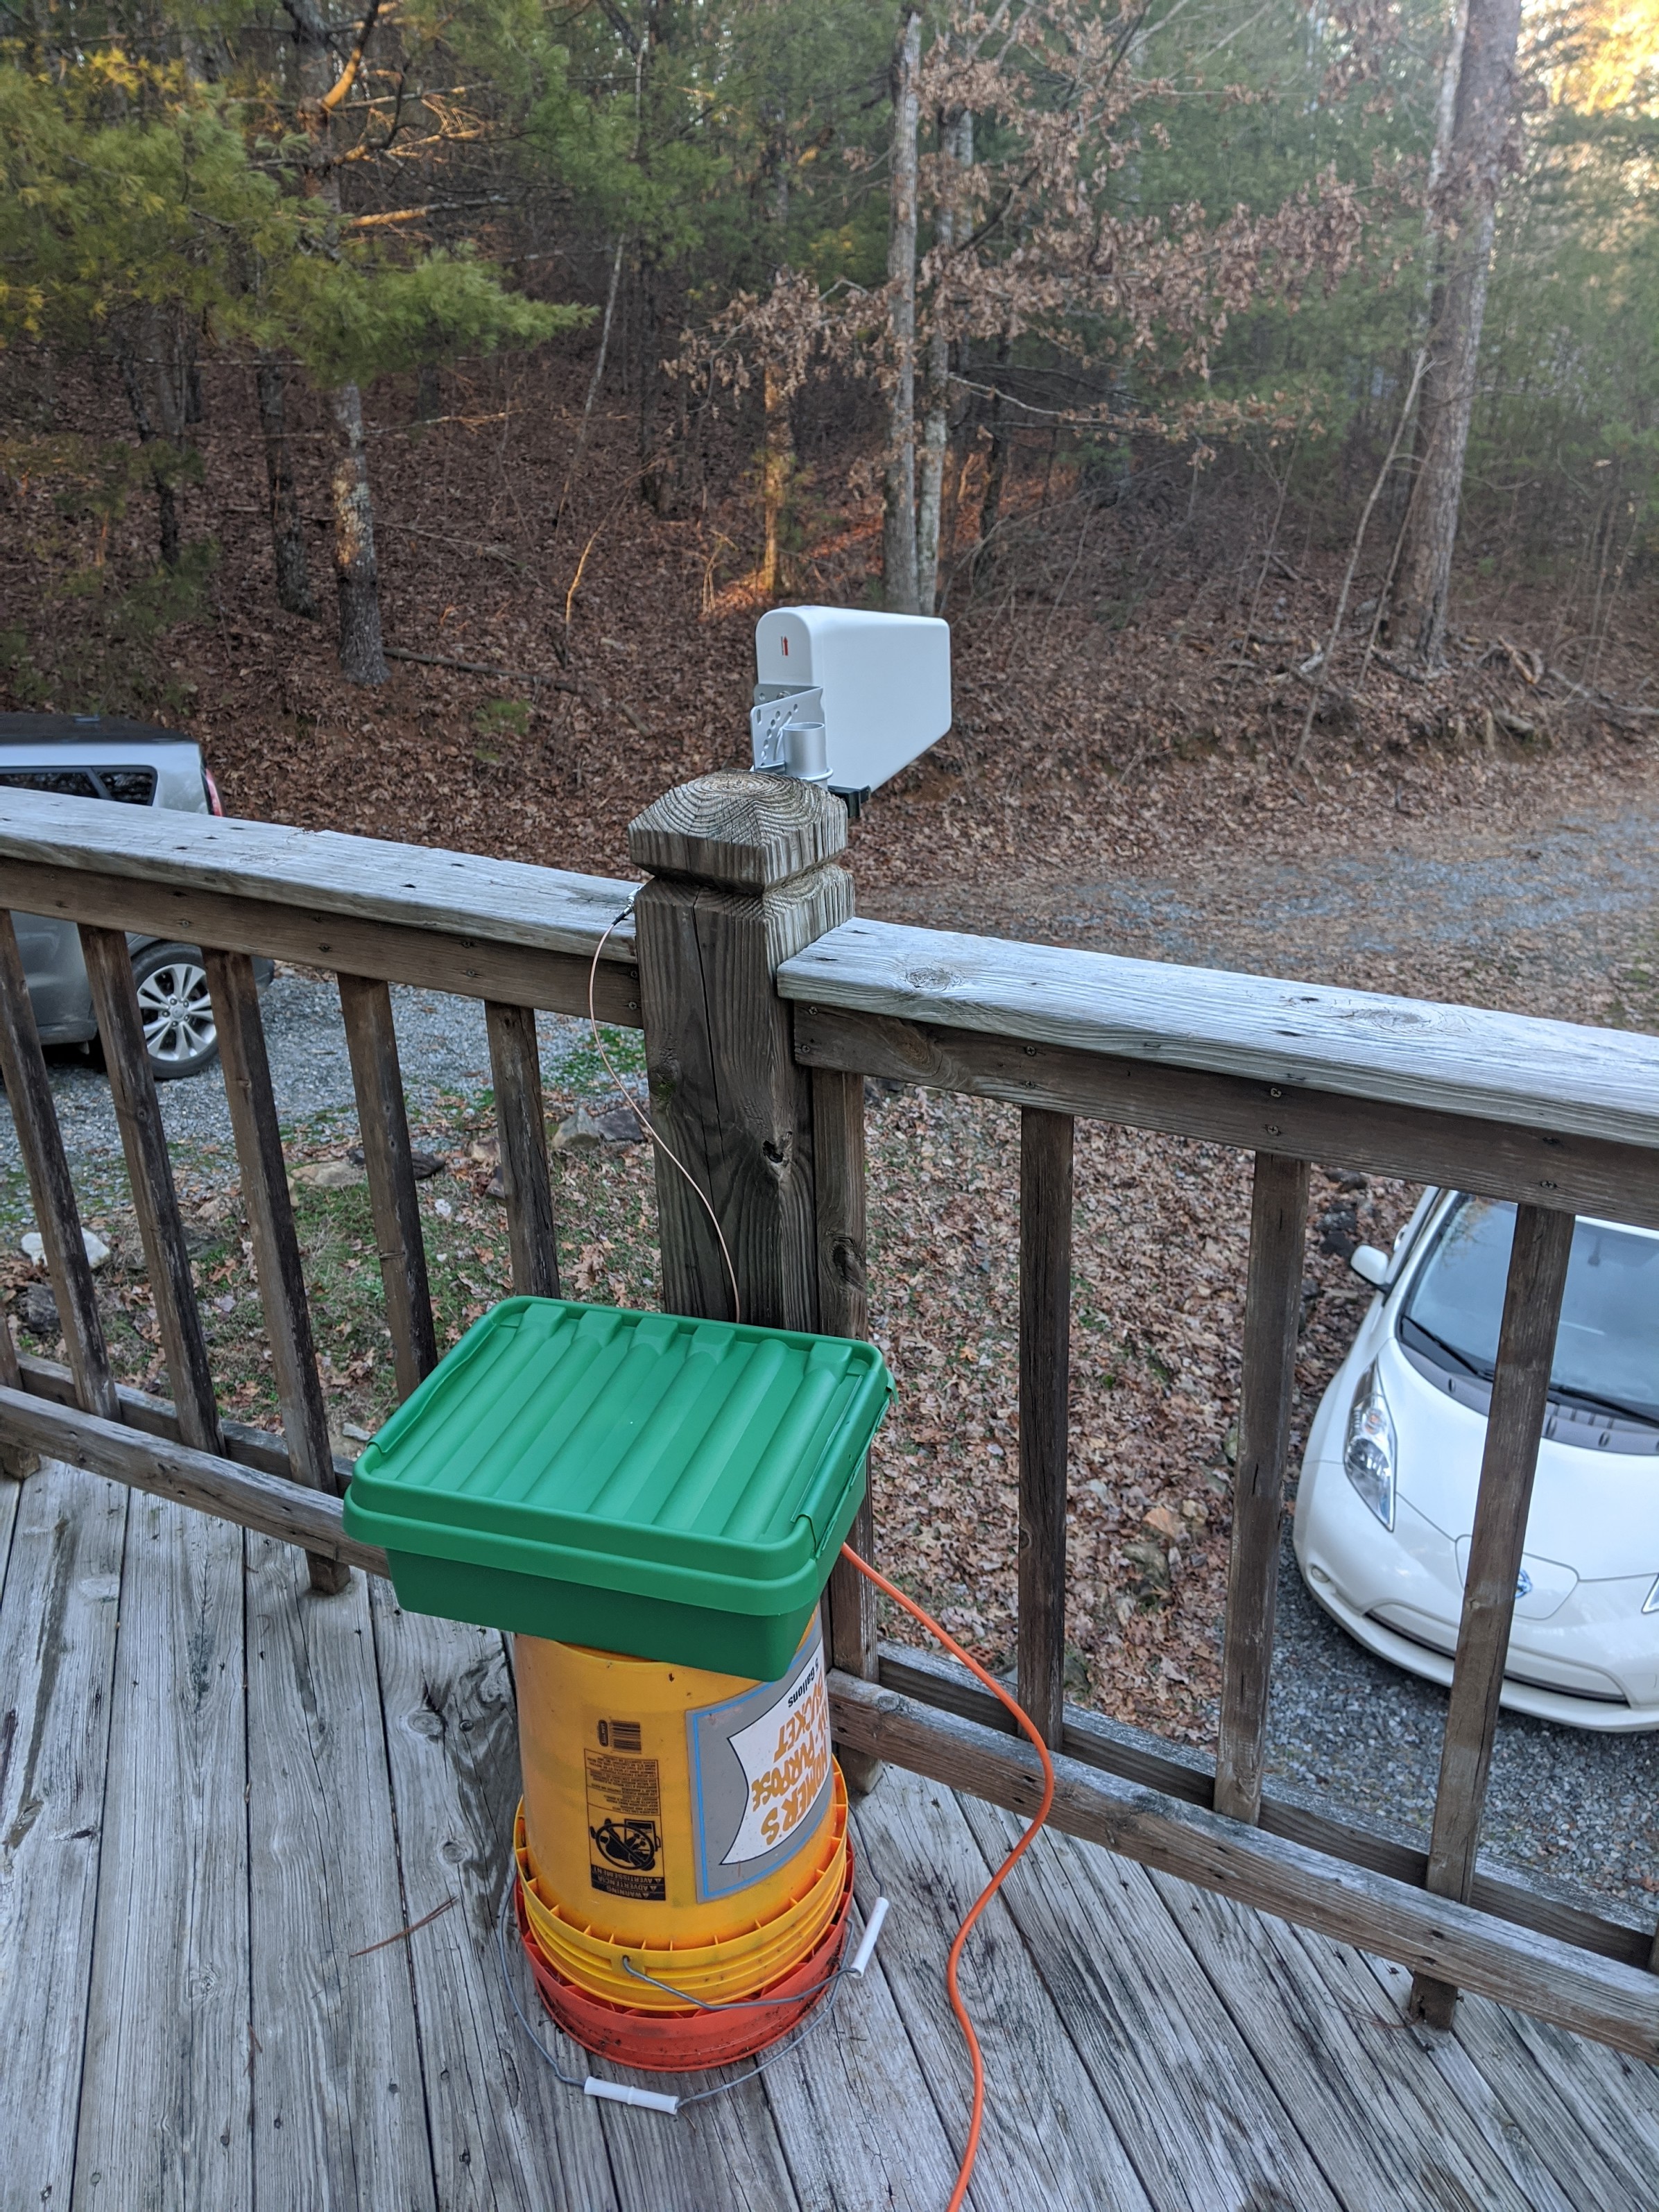
A minimal 4G LTE rural Internet access configuration
Here are some example outdoor multiband antennas that at suitable for 4G LTE Internet access:
| Model | Type | Antenna count | Gain | Frequencies | Price |
|---|---|---|---|---|---|
| Wilson 314411 | Yagi | 1 | 8-10.56dBi | 700-2700MHz | $63 |
| Proxicast ANT-128-001 | Yagi | 1 | 11dBi 1 | 700-2700MHz | $60 |
| Proxicast ANT-129-001 | Panel | 2 2 | 7-10dBi | 700-2700MHz | $100 |
- The reality is, this antenna probably has a range of gains, depending on what frequency is in use, but the manufacturer’s specs don’t provide a range. In my hands-on testing, this antenna and the Wilson 314411 performed almost identically, so I suspect they have similar gain.
- See the “Consider adding a second antenna” section.
The example antennas shown in the indoor installation section have gains in the 2.5-5dBi range. The above outdoor antennas have gains in the 7-11dBi range, which, in my opinion, represents a reasonable step up from the indoor antennas. It can be tempting to go out and buy the highest gain antenna you can find, but I recommend against doing that unless you have good reason to believe that something lower gain isn’t sufficient. The reason for that is that while yes, a higher gain antenna could improve your Internet connection speed, that’s not always the case. Higher gain antennas are larger, heavier, more expensive, and harder to aim. If you need one, then, by all means, get one, but I’d try a more moderate gain antenna first.
Consider adding a second antenna
Did your basic antenna configuration work? If so, great! If your radio supports more than one external antenna, then consider adding a second antenna to boost performance. For example, I found that adding a second antenna for my home Internet connection improved both upload and download speed by about 30%.
The way that this works is that LTE uses a technique called MIMO (multiple-input, multiple-output) to transmit and receive using multiple antennas at the same time. Poynting Antennas provides a good overview of how that works in the following video:
Of course, you don’t have to add a second antenna if you’re happy with your single antenna performance.
Two of the antennas mentioned on this page - the Netgear 6000450 and the Proxicast ANT-129-001 are two antennas that are packaged together in a single enclosure. Antenna models that have this functionality are often marked as MIMO antennas, and come with two antenna connectors.
Look at your mounting options
If you’re using an indoor antenna, then it may already come with a suitable mounting option, such as a set of clips or suction cups.
Outdoor antennas have a wide range of mounting options. Here are some examples:
- A simple pole mount can attach to the facia of a building. These are inexpensive and relatively inconspicuous.
- J Pipe mounts have a more substantial visual signature than a simple pole mount, but also provide a few extra feet of elevation.
- Longer antenna masts are useful if you want more than a few feet of elevation gain.
Consider an amplifier
Amplifiers (also called signal boosters) boost signal strength by amplifying the strength of the cellular signal. Most installations don’t need an amplifier, but this can be useful if, after optimizing your antenna configuration, you’re still not able to get a reliable connection.
If you do decide to try an amplifier, then my advice is:
- Purchase it from a company that has a good return policy, because you may find that it doesn’t help your speed.
- Pick an amplifier that operates on the band(s) used in your area. You may have identified these bands while optimizing your antenna configuration, but if not, you can call your wireless provider to find out which bands they use in your area.
- When testing an amplifier, be sure to directly compare the actual speed of your connection with and without the amplifier. This is because boosting the signal strength, and improving speed are not the same things. For example, when I tested out an amplifier on AT&T’s network, I found that the amplifier improved signal strength, but hurt performance. The download speed remained about the same, but the upload speed was reduced by about 50%.
The Mobile Internet Resource Center came to a similar conclusion. They found that 70-80% of the time, using a dual-antenna configuration outperforms a single amplifier:
If you’ve gotten this far, and decided that you do want to try an amplifier, then there are two types to consider:
-
In-line amplifiers, such as the Wilson Signal 4G. These connect to an antenna on one end, and your radio on the other end. This is the most direct and lowest loss approach since you can cable this type of amplifier directly into a compatible radio.
-
Traditional amplifiers, like the weBoost Home 4G. These connect to antennas on both ends. One end communicates with the cell tower, and the communicates with nearby radios.
It’s also essential to make sure that the amplifier that you select supports the bands that you want to connect with.
As the Antenna section shows, having multiple antennas can help performance. Here’s how that relates to amplifiers:
-
If you’re using an in-line amplifier configuration, then each amplifier should only be plugged into one antenna. You could opt for a single amplifier, get one amplifier for each antenna, or something in between.
-
If you’re using an amplifier configuration that’s not in-line, then I’d only use one amplifier. It may be possible to get two of these types of amplifiers into a configuration where they’re out of phase with each other, but that adds much complexity, so at that point, you’re probably better off with an in-line configuration.
Consider lightning protection
If any of your antennas are outdoors, then it’s essential to consider lightning protection. A standard method for protecting equipment from lightning strikes is to place a lightning arrester between your radio and antenna and attach it to a suitable grounding point, such as a ground rod.
When shopping for a lightning arrester, be sure to check its rated frequency, and make sure that all the cellular bands that you might use fall within that frequency range. For example, a lightning arrester could be rated to pass at 0-3GHz signals.
If you don’t have an electrical background, or just aren’t sure how to handle this area, then I recommend asking an electrician for their advice.
Add cabling
If you’re going to use external antennas, then selecting the right type of cabling to run between your radio and antenna is critical. There are three things to consider:
Connector type
There are lots of connectors out there, like SMA, FME, N, and TS9. Most of these connector types also have genders, where the only type of connection that’s possible is connecting a male end and a female end. To further complicate matters, there are also reverse polarity variants, often designated with an “RP-“ prefix (RP-TNC is reverse polarity TNC). It’s easy to order a cable with the wrong type of connecter accidentally, so double-check this detail before making a purchase.
Impedance
To maximize the effectiveness of your configuration, make sure that all cables, antennas, and lightning arresters have the same impedance. The most common ratings are 50 ohms and 75 ohms. The lower the impedance of your cabling, the less signal it loses, so standardize on 50 ohms if you can, to minimize loss.
Cable type and length
All radio cabling has some signal loss, and too much cable loss can lead to a slow or even no Internet connection.
The three most important variables that you can control to reduce signal loss are:
- Cable length. Length can be controlled by routing cables directly and placing your radio close to your antenna.
- The number of connections. This can be controlled by using as few cables as possible. For example, if you need to span 20 feet, then better to do that with a single 20-foot cable than two 10-foot cables.
- The type of cable. There a loss/cost/usability tradeoff here because the types of cables that have the lowest signal loss are also the most expensive and most challenging to handle.
The RG-6 cabling that you’ve likely seen used for cable TV can technically work for cellular Internet access, but I don’t recommend using it. The reason I recommend against using it is that it has a lot of signal loss.
There are many types of cables available, with names like RG-6, LMR-240, and LMR-400. Here are some example cable types, along with their expected loss per 100 feet (30.48 meters) of cable at some example frequencies:
| Cable type | 900MHz | 1800MHz | 2500MHz |
|---|---|---|---|
| RG-6 | 9.3dB | 14.0dB | 17.1dB |
| RG-58 | 13.7dB | 21.3dB | 26.6dB |
| LMR-195 | 11.1dB | 16.0dB | 19.0dB |
| LMR-240 | 7.6dB | 10.9dB | 12.9dB |
| LMR-400 | 3.9dB | 5.7dB | 5.8dB |
| LMR-600 | 2.5dB | 3.7dB | 4.4dB |
Times Microwave Systems - the makers of the “LMR” prefixed cables in the above cable offer a cable loss calculator for estimating the loss for a specific length of cable and frequency.
Here’s my general advice on selecting cables:
- If you need a cable that’s more than 10 feet, or 3 meters long, use LMR-400, unless you have a good reason for selecting something else. LMR-400 represents a reasonable cost/signal loss tradeoff at that kind of distance.
- For shorter cables, using something with a higher loss per foot than LMR-400 is probably fine, but still, try to select the lowest loss cable that you can.
Waterproofing
If any part of your installation is outdoors, then it’s vital to waterproof your equipment. Here are the two most common waterproofing measures:
- If you’re going to keep your radio outside, then a waterproof enclosure, like a utility box, can keep it dry.
- Each place where a coax cable makes an outdoor connection (like where it plugs into an antenna) should be waterproofed. More details are in the installation guide, but in short, you’ll probably want to pick up both waterproofing tape, like 3M Termflex and UV protection tape, like Scotch Super 33+.
Next up: Install your hardware
Now that you’ve selected your hardware, it’s time to install it.
« Previous: Pick a Data Plan Next: Install Hardware »