How to set up a cellular Internet connection
- DIY or hire a pro?
- Familiarize yourself with speed testing
- Get a compass
- Pick an antenna location
- Check your antenna polarity
- Aim your antennas
- Install lightning protection
- Mount your antennas
- Run cabling
- Waterproofing
- Final testing
In previous pages, you identified which mobile network to use for Internet access, picked a data plan, and selected your hardware. Now it’s time to set everything up.
DIY or hire a pro?
Before getting started, please think about which steps to do yourself, and which steps to hire a professional to perform. Installing the hardware for a cellular Internet connection can be technically challenging, and if you make a mistake, it could lead to injury or property damage. This warning is especially relevant if you’re going to climb a ladder or install any outdoor antennas.
Familiarize yourself with speed testing
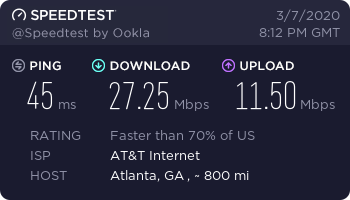
At multiple points in this installation sequence, I’m going to suggest running a speed test, so let’s make sure you have the procedure down now before we break out the hardware. Here’s how to run a speed test:
- Go to speedtest.net
- Click “GO”
- Wait a moment for the test to run, then record your results
Get a compass
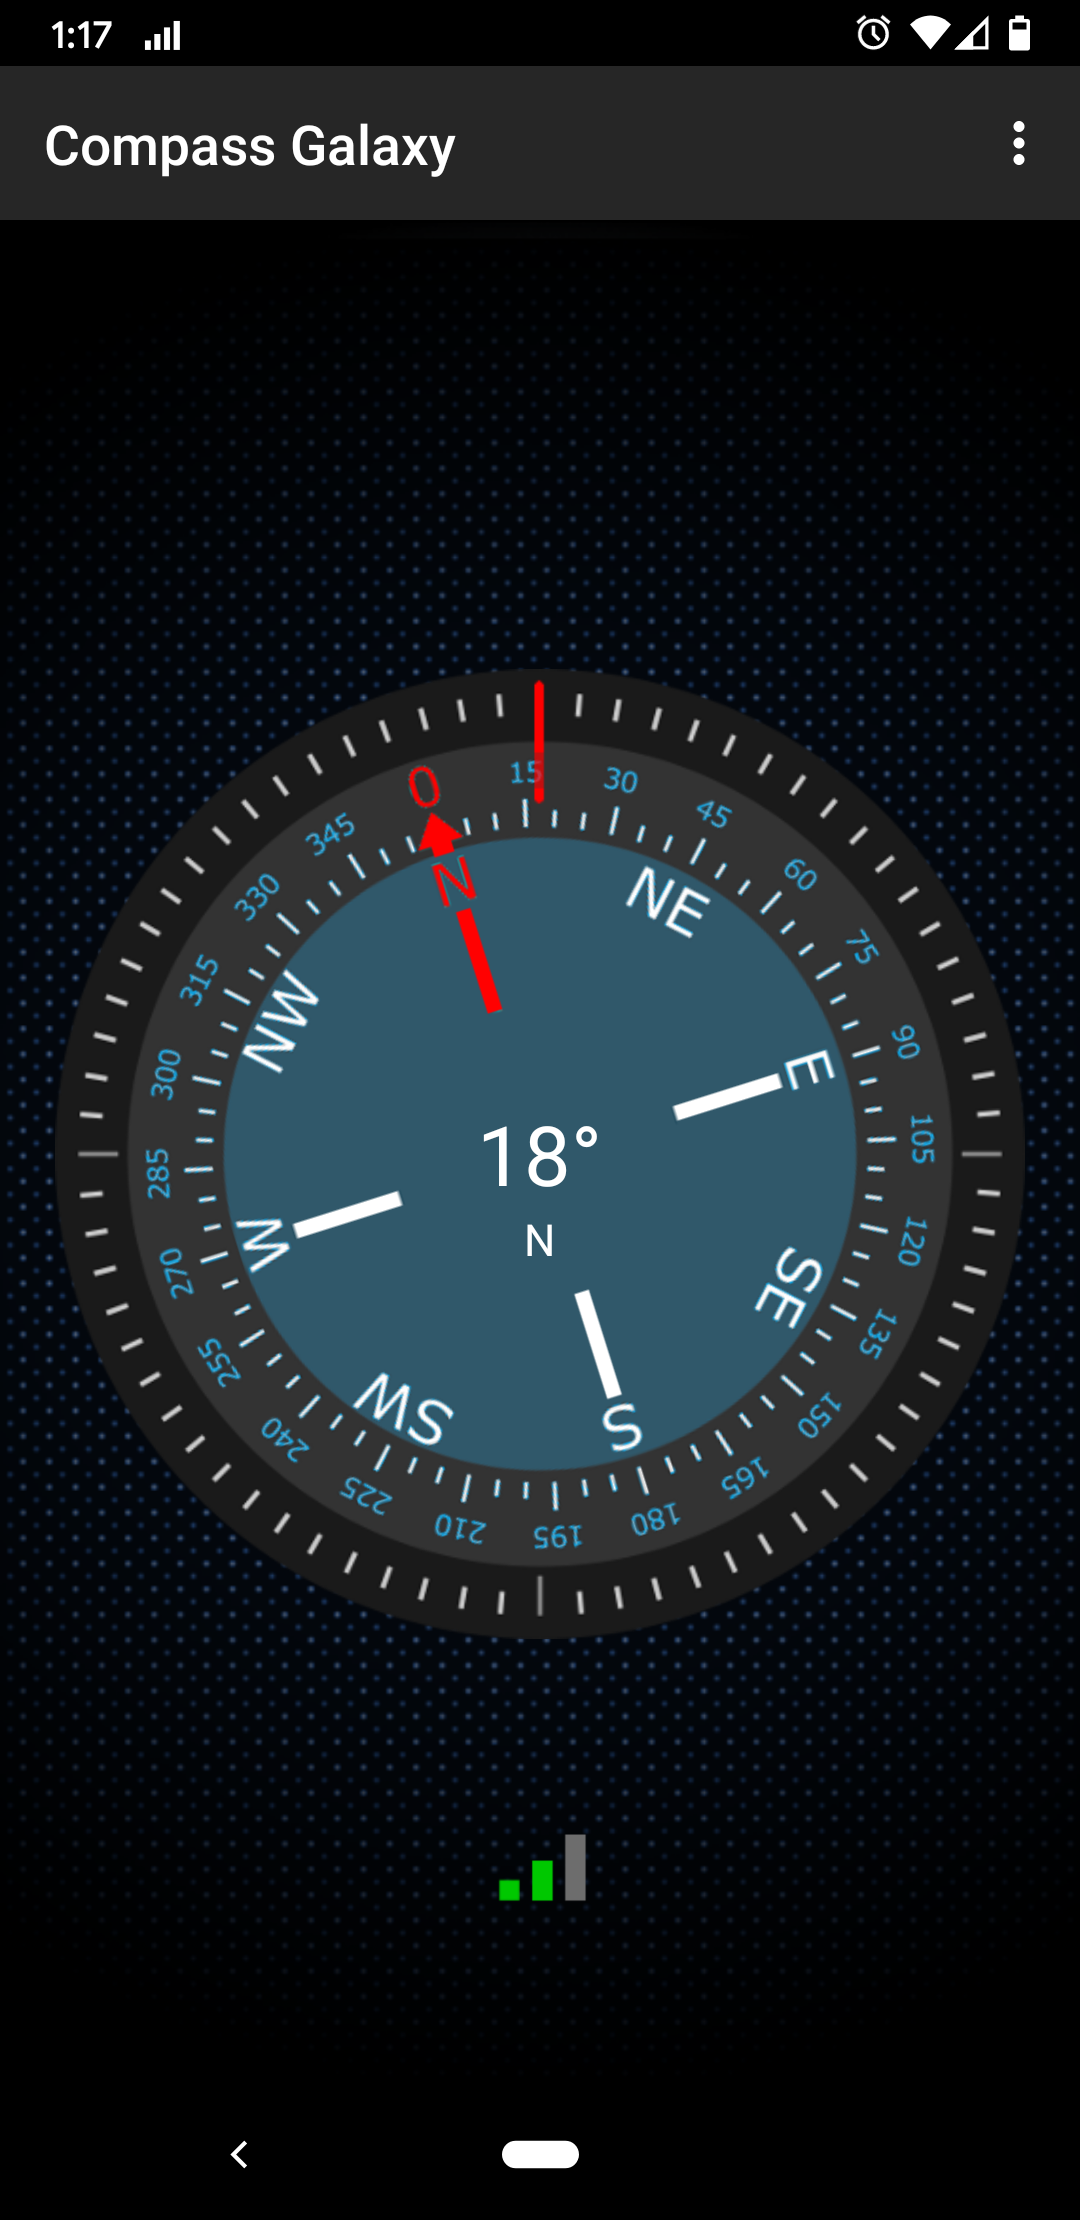
I recommend using a compass during the installation because it can save you time in two ways:
- It gives you a head start on aiming if you know where the nearest antenna tower is
- It lets you accurately measure the angle you’re aiming your antenna at, so you can make accurate performance records, then return to the configuration that works best at your location
Either a physical or electronic compass works. Just be sure that you’re consistent on what type of compass you use here since true north and magnetic north aren’t the same.
If you’re an iPhone or iPad user, then iOS comes with the built-in Compass app.
If you’re an Android user, then Compass Galaxy is the free compass app that I used to aim my antennas.
Pick an antenna location
The next step is to decide where to place your antennas. This is a repeat of the Check Coverage page’s Check signal strength, and Run speed tests sections, with the following new factors:
- Try to use the same smartphone, hotspot, or other device in this step as you intend to use for obtaining Internet access. If you previously used a different device, then the ideal location could have changed due to differences between the two devices, like which bands are supported.
- Stick with your device’s built-in, or stock antenna configuration if you can. That way, you eliminate the antenna angle as a variable.
- If your device supports band locking, then consider turning it on at this stage, so you can ensure that your device isn’t skewing the comparisons by switching between different bands. For example, you might start in the location that you think is likely to perform the best, and run a speed test on each supported band, to determine which offers the best performance at that location. You could then band lock to that band while evaluating other locations.
Hotspots typically have either a built-in display or web interface that makes the signal strength available. If you have both bar and numeric reading available, then opt for the more precise numeric readings. For example, here’s a report from my MOFI4500, which shows three bars, and signal strengths of -104 and -105 dBm:
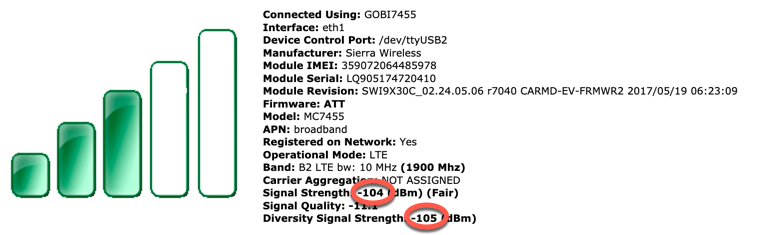
Signal strength is expressed in negative numbers, so all other things being equal, a -90dBm connection is faster and more reliable than a -100dBm connection.
Check your antenna polarity
If you are using a single antenna or a single physical unit that has multiple antennas inside, then this section doesn’t apply to you. If you’re using multiple physical antennas, read on.
LTE can use a technique called MIMO (multiple-input, multiple-output) to transmit and receive using multiple antennas at the same time. This can boost performance, but the performance gain is dependent on the antennas being cross-polarized, or otherwise de-correlated with each other. If you have two directional antennas, then this means mounting them at a 90-degree angle to each other. If you have omnidirectional antennas, then this means putting space between them. Poynting Antennas provides more details in the following video:
Aim your antennas
Now it’s time to aim your antennas.
If you have multiple antennas, then feel free to figure out the right general direction to aim in with just one antenna, then aim your remaining antennas after that.
Radio wave propagation can be unpredictable, so even you think you know what direction the tower you’ll connect to is in, I recommend testing out a wide range of angles.
For example, your first round of tests could involve aiming your antenna in each of the four cardinal directions, plus their midway points, and recording signal strength, and speed test results for each:
| Direction | Signal Strength | Download Speed | Upload Speed |
|---|---|---|---|
| North | |||
| North-East | |||
| East | |||
| South-East | |||
| South | |||
| South-West | |||
| West | |||
| North-West |
These eight initial measurements should tell you what general direction to aim in. For example, if the strongest signal and fastest connection came from the East, then you could perform subsequent testing between North-East and South-East.
Install lightning protection
If any of your antennas are outdoors, then it’s essential to consider lightning protection. Lightning protection devices need to be grounded to do their job. Otherwise, there’s no alternate path for them to direct the energy from a lightning strike. Here’s a video providing a quick overview:
This is an area where details really matter. If you’re not confident about your ability to install proper lightning protection, then check with an electrician.
Mount your antennas
Now that you’ve either installed lightning protection or decided that you won’t need it, it’s time to mount your antennas. The hardware selection document contains a section on antenna mounting options, so if you don’t have the hardware needed yet, take a look there.
If you do have the proper mounting hardware on hand, then follow its installation instructions, then mount your antennas to it, using the same angle and polarity that you previously identified as providing the best performance.
Run cabling
Now it’s time to cable everything together. Be sure to turn off your radio while you’re connecting and disconnecting cables because a radio can be damaged if it transmits without a cable plugged in.
Think about how to best route your cabling. You should both minimize the distance that the cabling needs to span, to the extent that you can without creating a safety hazard or eyesore. I found cable claps to be useful when cabling up my home Internet connection.
Waterproofing
Be sure to waterproof any outdoor equipment.
If your radio is going to be left outside, then an enclosure, like a utility box, can be used to protect it from the elements.
Each outdoor location where a coax cable makes a connection (like where it plugs into an antenna) should be waterproofed. The following video shows the technique that I used to waterproof my connections:
The two tapes that I used were:
- 3M Termflex for waterproofing
- Scotch Super 33+ for UV protection
Final testing
We’re getting close to the finish line!
Re-check the signal strength, and run a few speed tests to ensure that performance hasn’t degraded since you first aimed your antennas.
If you’re satisfied with the performance, then congratulations - you’re done! I hope you enjoy your new high-speed Internet access.
If you’re running into issues, then the troubleshooting guide has some useful tips.
« Previous: Select Hardware Next: Troubleshooting »